Display Role Hierarchy in Tree View

Requirement : Display role hierarchy in tree view in lighting. 
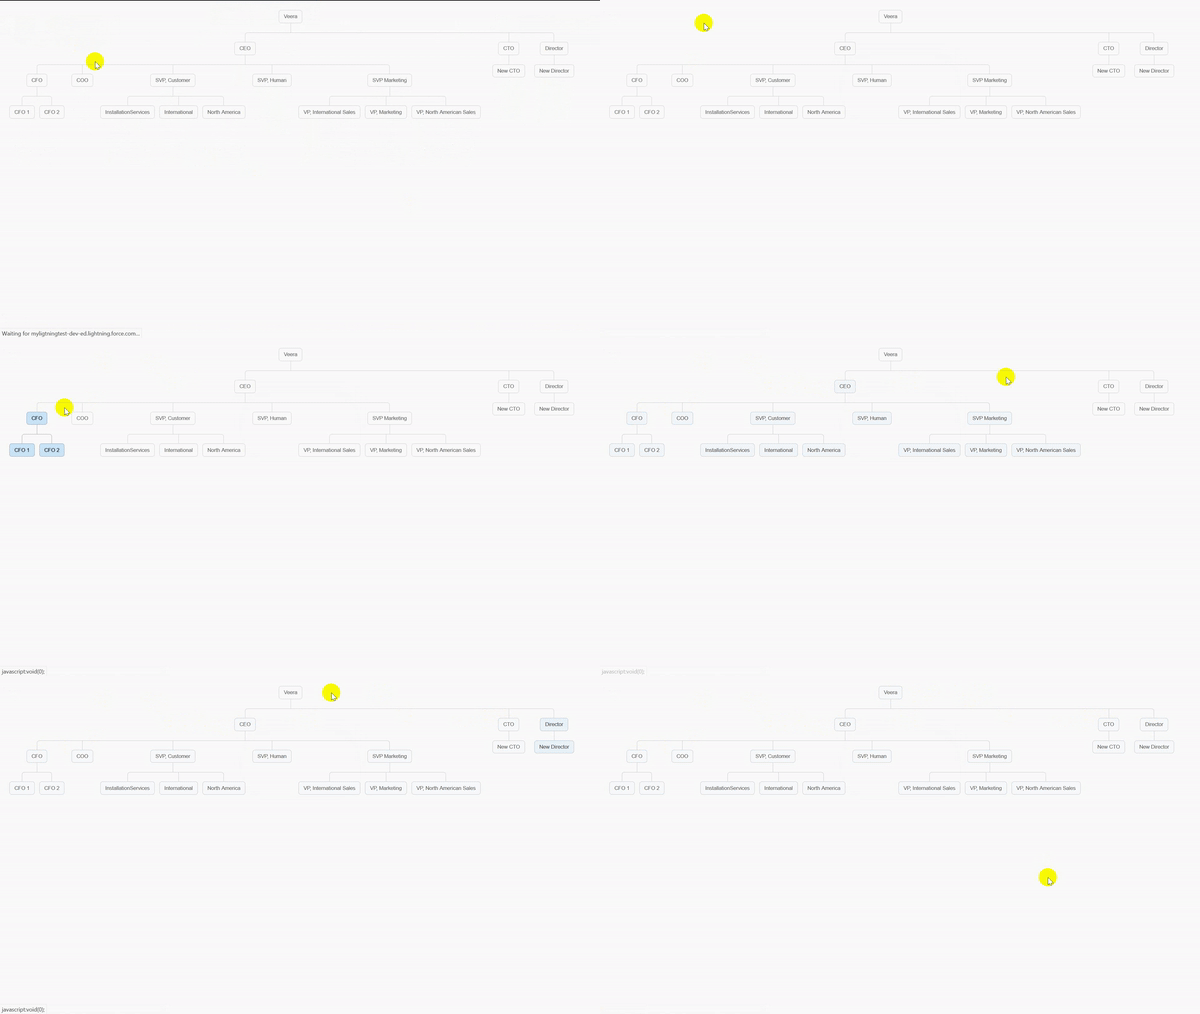
ezgif-4-ed24cfc018


PureTreeApp


<!–
/**
* Pure Tree App
* @category Lightning component
* @author Veeranjaneyulu k
* @date 17/June/2018
**/
–>
<aura:application extends="force:slds">
<c:PureTree />
</aura:application>

view raw

PureTreeApp

hosted with ❤ by GitHub

PureTree.cmp


<!–
/**
* Pure Tree Using CSS
* @category Lightning component
* @author Veeranjaneyulu k
* @date 17/June/2018
**/
–>
<aura:component description="Regions Pure Tree View" implements="force:appHostable,force:lightningQuickAction,flexipage:availableForAllPageTypes,lightning:actionOverride,force:hasRecordId,force:hasSObjectName,flexipage:availableForRecordHome,lightning:actionOverride,force:hasRecordId,forceCommunity:availableForAllPageTypes" access="global" controller="classicRegionTreeCntl">
<aura:handler name="init" value="{!this}" action="{!c.doInit}"/>
<aura:attribute name="wrapperLst" type="classicTreeWrapper[]"/>
<body >
<div class="tree">
<ul>
<li>
<a >Veera</a>
<ul>
<!– Parent Start –>
<aura:iteration items="{!v.wrapperLst}" var="con">
<li>
<a data-record="{!con.mainRole}" > {!con.mainRole} </a>
<ul>
<!– Child Start –>
<aura:iteration items="{!con.childRole}" var="con1">
<li>
<a data-record="{!con1.childRoleName}" >{!con1.childRoleName}</a>
<ul>
<!– Grand Child Start –>
<aura:iteration items="{!con1.grandchildRole}" var="con2">
<li>
<a data-record="{!con2}" >{!con2}</a>
</li>
</aura:iteration>
<!– Grand Child End –>
</ul>
</li>
</aura:iteration>
<!– Child End –>
</ul>
</li>
</aura:iteration>
<!–Parent End –>
</ul>
</li>
</ul>
</div>
</body>
</aura:component>

view raw

PureTree.cmp

hosted with ❤ by GitHub

PureTreeController.js


({
doInit : function(component, event, helper) {
var action = component.get("c.init");
action.setCallback(this, function(response) {
//store state of response
var state = response.getState();
if (state === "SUCCESS") {
//set response value in wrapperList attribute on component.
component.set('v.wrapperLst', response.getReturnValue());
}
});
$A.enqueueAction(action);
},
})

PureTree.css


.THIS * {margin: 0; padding: 0;font-size: 10px;}
.THIS .tree ul {
padding-top: 20px; position: relative;
transition: all 0.5s;
-webkit-transition: all 0.5s;
-moz-transition: all 0.5s;
}
.THIS .tree li {
float: left; text-align: center;
list-style-type: none;
position: relative;
padding: 20px 5px 0 5px;
transition: all 0.5s;
-webkit-transition: all 0.5s;
-moz-transition: all 0.5s;
}
/*We will use ::before and ::after to draw the connectors*/
.THIS .tree li::before, .THIS .tree li::after{
content: '';
position: absolute; top: 0; right: 50%;
border-top: 1px solid #ccc;
width: 50%; height: 20px;
}
.THIS .tree li::after{
right: auto; left: 50%;
border-left: 1px solid #ccc;
}
/*We need to remove left-right connectors from elements without
any siblings*/
.THIS .tree li:only-child::after, .THIS .tree li:only-child::before {
display: none;
}
/*Remove space from the top of single children*/
.THIS .tree li:only-child{ padding-top: 0;}
/*Remove left connector from first child and
right connector from last child*/
.THIS .tree li:first-child::before, .THIS .tree li:last-child::after{
border: 0 none;
}
/*Adding back the vertical connector to the last nodes*/
.THIS .tree li:last-child::before{
border-right: 1px solid #ccc;
border-radius: 0 5px 0 0;
-webkit-border-radius: 0 5px 0 0;
-moz-border-radius: 0 5px 0 0;
}
.THIS .tree li:first-child::after{
border-radius: 5px 0 0 0;
-webkit-border-radius: 5px 0 0 0;
-moz-border-radius: 5px 0 0 0;
}
/*Time to add downward connectors from parents*/
.THIS .tree ul ul::before{
content: '';
position: absolute; top: 0; left: 50%;
border-left: 1px solid #ccc;
width: 0; height: 20px;
}
.THIS .tree ul ul:empty::before{
display: none;
}
.THIS .tree li a{
border: 1px solid #ccc;
padding: 5px 10px;
text-decoration: none;
color: #666;
font-family: arial, verdana, tahoma;
font-size: 11px;
display: inline-block;
border-radius: 5px;
-webkit-border-radius: 5px;
-moz-border-radius: 5px;
transition: all 0.5s;
-webkit-transition: all 0.5s;
-moz-transition: all 0.5s;
}
/*Time for some hover effects*/
/*We will apply the hover effect the the lineage of the element also*/
.THIS .tree li a:hover, .THIS .tree li a:hover+ul li a {
background: #c8e4f8; color: #000; border: 1px solid #94a0b4;
}
/*Connector styles on hover*/
.THIS .tree li a:hover+ul li::after,
.THIS .tree li a:hover+ul li::before,
.THIS .tree li a:hover+ul::before,
.THIS .tree li a:hover+ul ul::before{
border-color: #94a0b4;
}

view raw

PureTree.css

hosted with ❤ by GitHub

classicRegionTreeCntl.apxc


/** Class Name : classicRegionTreeCntl
* Description : This controller is used to create Region Tree to display in lightning component
* Created By : Veera k
* Created On : 17th June 2018
*
* Modification Log:
* ————————————————————————————————————————————–
* Developer Date Modification ID Description
* —————————————————————————————————————————————
**/
public class classicRegionTreeCntl {
@AuraEnabled
public static List<classicTreeWrapper> init(){
List<UserRole> allRoles=[SELECT DeveloperName,Id,Name,ParentRoleId FROM UserRole];
Map<Id,UserRole> parentRole= new Map<Id,UserRole>(); //Parent Role
Map<Id,UserRole> childRole= new Map<Id,UserRole>();
Map<Id,UserRole> grandChildRole= new Map<Id,UserRole>();
Map<Id,UserRole> exceptParentRole= new Map<Id,UserRole>();
Map<String,List<String>> parentwithchild = new Map<String,List<String>>(); // This is Parent with child
Map<String,List<String>> childwithGrandchild = new Map<String,List<String>>(); // This is child with grand child
for(UserRole s : allRoles){
if(s.ParentRoleId==null)
parentRole.put(s.id,s);
else
exceptParentRole.put(s.id,s);
}
for(UserRole t: exceptParentRole.values()){
if(parentRole.containsKey(t.ParentRoleId)){
childRole.put(t.id,t);
}else{
grandChildRole.put(t.id,t);
}
}
for(Id oneEachCntry: parentRole.keyset()){
String mainParentRole= parentRole.get(oneEachCntry).Name;
List<String> allChilds= new List<String>();
for(Id oneEachRgn : childRole.keyset() ){
if(childRole.get(oneEachRgn).ParentRoleId==oneEachCntry)
allChilds.add(childRole.get(oneEachRgn).Name);
}
parentwithchild.put(mainParentRole,allChilds);
}
for(Id oneEachSubCnty : childRole.keyset()){
String childRoleName = childRole.get(oneEachSubCnty).Name;
List<String> allgrandChilds= new List<String>();
for(Id oneEachSubRgn : grandChildRole.keyset() ){
if(grandChildRole.get(oneEachSubRgn).ParentRoleId==oneEachSubCnty)
allgrandChilds.add(grandChildRole.get(oneEachSubRgn).Name);
}
childwithGrandchild.put(childRoleName,allgrandChilds);
}
List<classicTreeWrapper> myFinalList = new List<classicTreeWrapper>();
for(String myMainCntry : parentwithchild.KeySet()){
classicTreeWrapper oneWrap = new classicTreeWrapper();
oneWrap.mainRole = myMainCntry ;
List<classicTreeInnerWrapper> myInnerWr= new List<classicTreeInnerWrapper>();
for(String dumpRggn : parentwithchild.get(myMainCntry)){
classicTreeInnerWrapper oneInnerWrap = new classicTreeInnerWrapper();
oneInnerWrap.childRoleName = dumpRggn ;
oneInnerWrap.grandchildRole = childwithGrandchild.get(dumpRggn);
myInnerWr.add(oneInnerWrap);
}
oneWrap.childRole =myInnerWr;
myFinalList .add(oneWrap);
}
return myFinalList;
}
}

classicTreeWrapper.apxc


/*
* Purpose: This is Wrapper Class for Classic Region Tree functionality
* Created By: Veera k 17/06/2018
* Last Modified By:
* Current Version: v1.0
* Revision Log:
* v1.1 –
* v1.0 –
*/
public class classicTreeWrapper {
@AuraEnabled public String mainRole {get;set;}
@AuraEnabled public List<classicTreeInnerWrapper> childRole {get;set;}
public classicTreeWrapper(){
childRole = new List<classicTreeInnerWrapper>();
}
}

classicTreeInnerWrapper.apxc


/*
* Purpose: This is Inner Wrapper Class for Classic Region Tree functionality
* Created By: Veera k 17/06/2018
* Last Modified By:
* Current Version: v1.0
* Revision Log:
* v1.1 –
* v1.0 –
*/
public class classicTreeInnerWrapper {
@AuraEnabled public String childRoleName {get;set;}
@AuraEnabled public List<String> grandchildRole {get;set;}
public classicTreeInnerWrapper(){
grandchildRole = new List<String>();
}
}


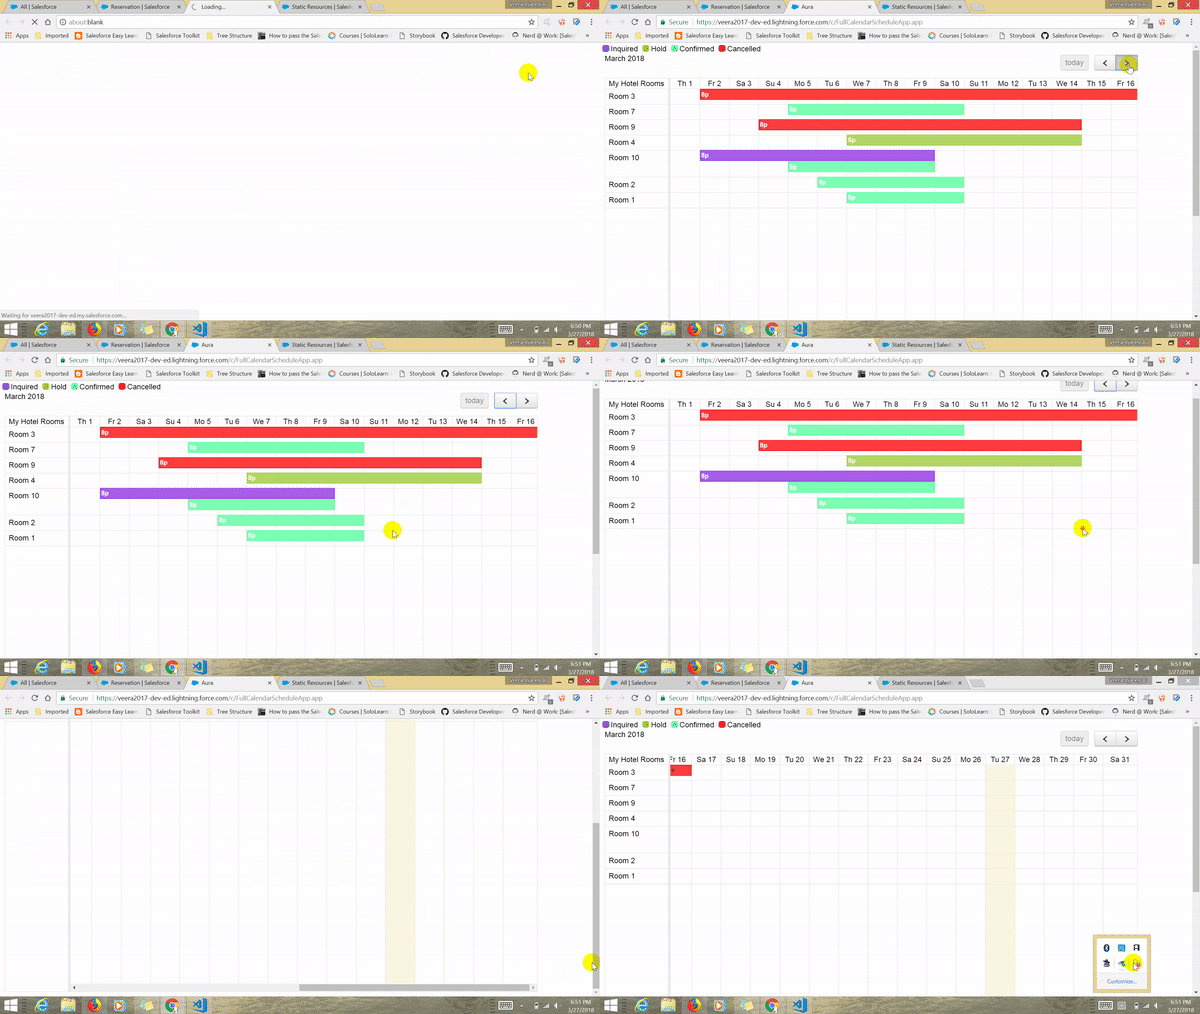
Showing Events in Full Calendar Using Scheduler Plugin in lightning components

ezgif.com-video-to-gif


Hi ,

I have Two custom objects in my salesforce (Property and Reservation). Property is Parent Object and Reservation is Child Object. Each property can have multiple Reservations. Property will have all the properties and Reservation will have all the bookings that made to properties.

I want to show all the properties and reservations on a calendar. I have gone through many app exchange products and 3rd party paid plugins. After some research , i decided to implement using Full Calendar Scheduler Plugin.

This Plugin also paid one, but non-commercial purpose it is free. Check out more

https://fullcalendar.io/scheduler/purchase

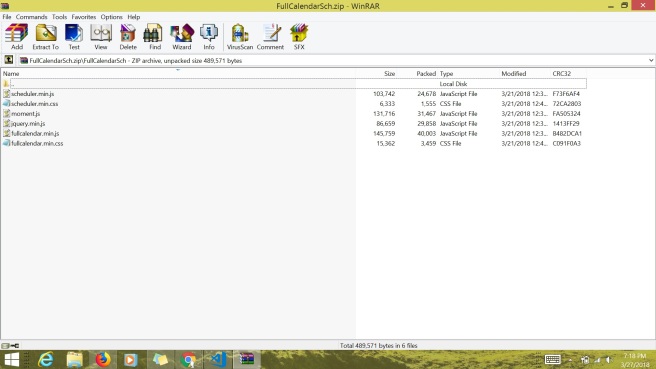
First we need to download libraries and put it into a Zip file and upload in to static Resource.

List of Files need to download ,

Static Resource

Create a Component “FullCalendarSchedular”


<!–
/**
* Full Calendar using Schedular Plugin
* @category Lightning component
* @author Veeranjaneyulu k
**/
–>
<aura:component controller="FullCalendarSchCntr" implements="force:appHostable,flexipage:availableForAllPageTypes,flexipage:availableForRecordHome,force:hasRecordId,forceCommunity:availableForAllPageTypes,force:lightningQuickAction">
<!– LIBRARIES –>
<ltng:require styles="{!join(',',
$Resource.FullCalendarSch + '/FullCalendarSch/fullcalendar.min.css',
$Resource.FullCalendarSch + '/FullCalendarSch/scheduler.min.css')}"
scripts="{!join(',',
$Resource.FullCalendarSch + '/FullCalendarSch/moment.js',
$Resource.FullCalendarSch + '/FullCalendarSch/jquery.min.js',
$Resource.FullCalendarSch + '/FullCalendarSch/fullcalendar.min.js',
$Resource.FullCalendarSch + '/FullCalendarSch/scheduler.min.js')}"
afterScriptsLoaded="{!c.jsLoaded}"/>
<!– ATTRIBUTES –>
<aura:attribute type="Object[]" name="Resources"/>
<!–Calendor Events Start –>
<div class="EventSection" >
<span>
<ul >
<li><span class="event-Inquired"></span>Inquired</li>
<li><span class="event-Hold"></span>Hold</li>
<li><span class="event-Confirmed"></span>Confirmed</li>
<li><span class="event-Cancelled"></span>Cancelled</li>
</ul>
</span>
</div>
<!–Calendor Events End –>
<!– Calendar Section Start –>
<div id="container" style="width: 90% !important;overflow:hidden;margin:10px;">
<div id="calendar"></div>
</div>
<!– Calendar Section End –>
</aura:component>

view raw

gistfile1.txt

hosted with ❤ by GitHub

Controller “FullCalendarSchedularController


({
jsLoaded : function(component, event, helper) {
var prpList=component.get("v.Resources");
if(!prpList.length)
{
helper.getReasource(component, event);
}
},
})

Helper “FullCalendarSchedularHelper


({
getReasource: function(component,event){
var action = component.get("c.getReasource");
var self = this;
action.setCallback(this, function(response) {
var state = response.getState();
if (component.isValid() && state === "SUCCESS") {
var eventArr = response.getReturnValue();
self.jsLoaded(component,eventArr);
component.set("v.Resources", response.getReturnValue());
}
});
$A.enqueueAction(action);
},
jsLoaded : function(component,events){
$(document).ready(function(){
(function($) {
var tempR = events;
var jsnResourcesArray = [];
var jsnEventsArray = [];
for(var i = 0;i < tempR.length;i++){
jsnResourcesArray.push({
'title':tempR[i].Name,
'id':i
});
for(var k=0;k < tempR[i].Reservations__r.length ; k++){
jsnEventsArray.push({
'resourceId': i,
'id': tempR[i].id,
'start': tempR[i].Reservations__r[k].Check_in__c,
'end': tempR[i].Reservations__r[k].Check_out__c,
'color' : myEventColor(tempR[i].Reservations__r[k].Status__c)
});
}
}
$('#calendar').fullCalendar({
schedulerLicenseKey: 'GPL-My-Project-Is-Open-Source',
defaultView: 'timelineMonth',
locale: 'en',
resourceAreaWidth: '12%',
resourceLabelText: 'My Hotel Rooms',
views: {
},
resources:jsnResourcesArray,
events: jsnEventsArray
});
})(jQuery);
});
function myEventColor(status) {
if(status === 'Inquired'){
return 'BlueViolet';
}
else if (status === 'Hold') {
return 'YellowGreen';
} else if (status === 'Confirmed') {
return '#54ff9f';
} else { //Cancelled
return '#ff0000';
}
}
},
})

CSS “FullCalendarScheduleCss”


.THIS .event-no {
background:#FFFFFF;
border-color:#FFFFFF;
}
.THIS .event-Inquired {
background:#8a2be2;
border-color:#8a2be2;
}
.THIS .event-Hold {
background:#9acd32;
border-color:#9acd32;
}
.THIS .event-Confirmed {
background:#54ff9f;
border-color:#54ff9f;
}
.THIS .event-Cancelled {
background:#ff0000;
border-color:#ff0000;
}
.THIS.EventSection {
float:left;
}
.THIS.EventSection ul {
margin:0;padding:0;list-style:none;
}
.THIS.EventSection ul li {
margin:0;padding:5px;float:left;
}
.THIS.EventSection ul li span {
display:block; height:14px; width:14px; margin-right:4px; float:left; border-radius:4px;
}
/* This is Events End */

Apex Controller : “FullCalendarSchCntr”


/** Class Name : FullCalendarSchCntr
* Description : Convenience class that can be used in Full calendar (getting Properties and Reservations)
* Created By : Veeranjaneyulu k
* Created On : 22nd March 2018
*
* Modification Log:
* ————————————————————————————————————————————–
* Developer Date Modification ID Description
* —————————————————————————————————————————————
**/
public class FullCalendarSchCntr {
/**
* @description : To get the properties with reservations
* @param :
* @return : List<Property__c>
**/
@AuraEnabled
public static List<Property__c> getReasource(){
//List<sObject> recordList = Database.query('select id,name from property__C where status=\'Active\'');
List<Property__c> proList =[select id,name ,(SELECT Name, Check_in__c, Check_out__c,Status__c,Property__r.Name,Property__c FROM Reservations__r where CALENDAR_YEAR(Check_in__c)= 2018) from Property__c where id in (select Property__c from Reservation__c where CALENDAR_YEAR(Check_in__c)= 2018) ];
return proList;
}
}

Application : “FullCalendarScheduleApp”


<aura:application >
<c:FullCalendarSchedule/>
</aura:application>


Finally preview the Application , to see the output. Before that create some records on Property and Reservation.

Stay tune for more updates !!!!


Pop Overs in lightning Components

Hi,

While working with input forms , Pop-overs are more useful to enter correct details. By using “lightning:overlayLibrary“, we can show Pop Overs on multiple input fields with different text.

Pop Over


Lets look in to Example,


c:popOverCmp
<aura:component implements="force:appHostable,flexipage:availableForRecordHome,force:hasRecordId,forceCommunity:availableForAllPageTypes,force:lightningQuickAction"
access="global">
<lightning:overlayLibrary aura:id="overlayLib"/>
<div class="slds-page-header slds-col slds-has-flexi-truncate slds-media__body">
<div class="slds-size_4-of-12">
<div class="slds-text-align_left slds-m-around_x-small slds-p-left_large slds-p-right_large ">
<div >
<lightning:input class="mypopover" value="mypopover" onfocus="{!c.handleShowPopover}" label="Name" placeholder="Enter name" name="This is Full Name" >
</lightning:input>
</div>
</div>
<div class="slds-text-align_left slds-m-around_x-small slds-p-left_large slds-p-right_large ">
<div >
<lightning:input class="mypopover1" value="mypopover1" onfocus="{!c.handleShowPopover}" label="Address" placeholder="Enter Address" name="Address:Street,City,Country,Postal Code" />
</div>
</div>
<div class="slds-align_absolute-center">
<lightning:button name="popover" label="Show Popover" onclick="{!c.handleShowPopover}"/>
</div>
</div>
</div>
</aura:component>
popOverCmpController.js
({
handleShowPopover : function(component, event, helper) {
var selectedItem = event.getSource().get("v.name");
var selectedItemCss = event.getSource().get("v.value");
var str = "";
str += "."+selectedItemCss ;
component.find('overlayLib').showCustomPopover({
body: selectedItem,
referenceSelector: str,
cssClass: "popoverclass"
}).then(function (overlay) {
setTimeout(function(){
//close the popover after 1 seconds
overlay.close();
}, 1000);
});
},
})
popOverCmp.css
.THIS .popoverclass {
min-height: 100px;
}

Modal window in lightning components

Hi,

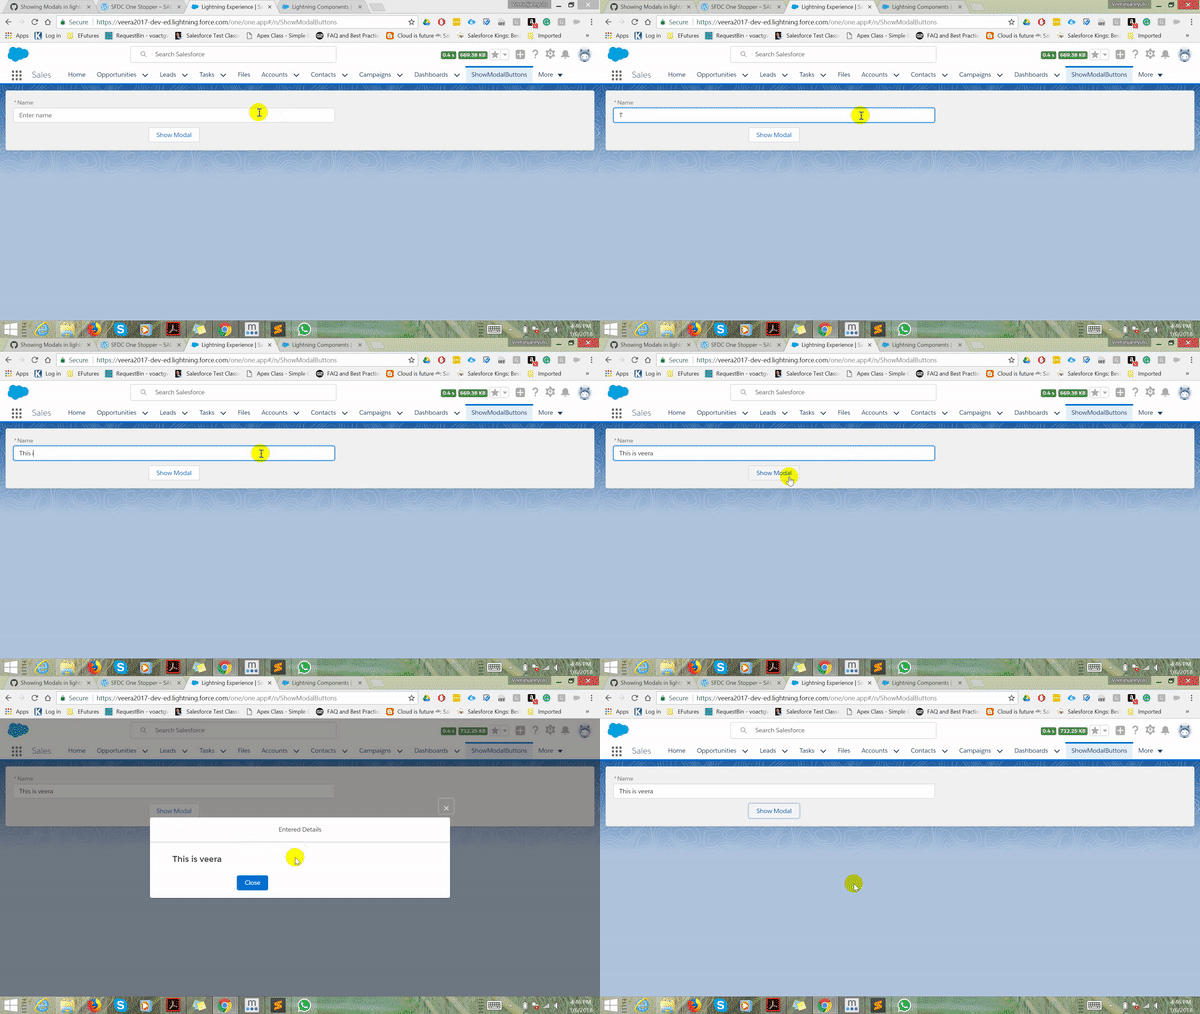
For Creating a new modal window using slds , takes lot of time and effort. Good bye to all those slds implementation to open modal window in lightning components. Using “lightning:overlayLibrary” tag , modal window can be easily shown in components. It is easy to customize also.

This component is supported in Lightning Experience, Salesforce1, and Lightning communities only. This component requires API version 41.0 and later.


Modal window


c:ModalWindow
<aura:component implements="force:appHostable,flexipage:availableForRecordHome,force:hasRecordId,forceCommunity:availableForAllPageTypes,force:lightningQuickAction"
access="global">
<aura:attribute name="myVal" type="String" />
<!– This line to show modal window from controller –>
<lightning:overlayLibrary aura:id="overlayLib"/>
<div class="slds-page-header slds-col slds-has-flexi-truncate slds-media__body">
<div class="slds-grid slds-grid_pull-padded-medium">
<div class="slds-col slds-p-horizontal_medium">
<lightning:input label="Name" placeholder="Enter name" name="myname" value="{!v.myVal}" required="true" />
<div class="slds-align_absolute-center">
<lightning:button name="modal" class="MyBtn" label="Show Modal" onclick="{!c.handleShowModal}"/>
</div>
</div>
<div class="slds-col slds-p-horizontal_medium"></div>
</div>
</div>
</aura:component>
ModalWindowController.js
({
handleShowModal : function (component, event, helper) {
var myName= component.get("v.myVal");
var modalBody;
$A.createComponent("c:modalContent", {"nameParent":myName},
function(content, status) {
if (status === "SUCCESS") {
modalBody = content;
component.find('overlayLib').showCustomModal({
header: "Entered Details",
body: modalBody,
showCloseButton: true,
cssClass: "mymodal",
closeCallback: function() {
console.log('You closed the alert!');
}
})
}
});
},
})
ModalWindow.css
.THIS .MyBtn{
margin-top:10px;
}
c:modalContent
<aura:component access="global">
<aura:attribute name="nameParent" type="String" />
<!– This is the reference of Modal window –>
<lightning:overlayLibrary aura:id="overlayLib"/>
<div class="demo-only demo-only–sizing slds-grid slds-wrap">
<div class="slds-size_8-of-12">
<div class="slds-text-align_left slds-m-around_x-small slds-p-left_large slds-p-right_large ">
<h1 class="slds-page-header__title slds-align-middle">{!v.nameParent}</h1>
</div>
<div class="slds-align_absolute-center">
<lightning:button label="Close" onclick="{!c.handleClose}" variant="brand" class="slds-m-top–medium"/>
</div>
</div>
</div>
</aura:component>
modalContentController.js
({
handleClose : function(component, event, helper) {
//Closing the Modal Window
component.find("overlayLib").notifyClose();
},
})

Fields comparison using Dynamic SOQL Query

Hi,

There is a requirement  to check the duplicate records with some web service callout response values like street,city,country,region,postal code.  For some callouts , response values are empty or null and some times it is having actual address values. We can’t expect , when it is having values and when it is empty.

To fetch the duplicate records , we need to pass the input Strings to soql query. Before constructing query , we are checking if the input address is empty or not. If it is not empty, we are adding it to the list.  Dynamically creating query at the end and it will fectch all the duplicate records with matching input Strings.


/*
* Purpose: Check the Duplicate Records with custom Address Fields on Custom Object.
* Created By: Veera k
* Last Modified By:
* Current Version: v1.0
* Revision Log:
* v1.1 –
* v1.0 –
*/
public class AddressCheck{
public Static List<CustomObject__c> Comparision(String street,String city,String region,String country,String postalCode) {
String queryString='Select ID,name,Street__c,City__c,Region__c,Country__c,Postal_Code__c from CustomObject__c ';
List<CustomObject__c> duplicateAddress;
List<String> myFilter = new List<String>();
//Check Street is Blank or Not
if(!String.isBlank(street))
myFilter.add('Street__c LIKE \'%' + street + '%\' ');
//Check City is Blank or Not
if(!String.isBlank(city))
myFilter.add('City__c LIKE \'%' + city + '%\' ');
//Check Region is Blank or Not
if(!String.isBlank(region))
myFilter.add('Region__c LIKE \'%' + region + '%\' ');
//Check Country is Blank or Not
if(!String.isBlank(country))
myFilter.add('Country__c LIKE \'%' + country + '%\' ');
//Check Postal code is Blank or Not
if(!String.isBlank(postalCode))
myFilter.add('Postal_Code__c LIKE \'%' + postalCode + '%\' ');
if(myFilter.size()>0){
queryString += ' WHERE ' + myFilter[0];
for (Integer i = 1; i < myFilter.size(); i++)
queryString += 'AND ' + myFilter[i];
}
queryString += 'ORDER BY createdDate ASC';
duplicateAddress = database.query(queryString );
return duplicateAddress;
}
}

Render Multiple section’s in Lightning Component

I have 3 sections in my component and a pick-list value. On change of this pick-list value , i need to show related sections. There are two ways to accomplish this requirement. First way is using css property (display:none). Second way is using aura-if and aura-set. By using Css property , it will completely remove the element from lightning component. The efficient way of doing this , using aura tags.

IF ELse

Let’s get it into the code.

MultipleIFELSE.Component

<aura:component implements="forceCommunity:availableForAllPageTypes" access="global">

<aura:attribute name="toggleGer" type="boolean" default="true" />
<aura:attribute name="toggleEng" type="boolean" />

<!-- Start Picklist Values -->
<div class="slds-align_absolute-center ">
	<lightning:select name="mySelect" label="Select a language" aura:id="mySelect" onchange="{!c.toggle}" >
<option>German</option>
<option>Spanish</option>
<option>English</option>
</lightning:select>
</div>
<!-- End Picklist Values -->
<!-- Start of Multiple If's-->
<aura:if isTrue="{!v.toggleGer}">
<div aura:id="German" class="demo-only demo-only--sizing slds-grid slds-wrap slds-p-vertical_medium">
<div class="slds-size_3-of-12 slds-p-left_xx-large slds-p-horizontal_x-large" >
This is German
</div>
</div>
<aura:set attribute="else">
<aura:if isTrue="{!v.toggleEng}">
<div aura:id="English" class="demo-only demo-only--sizing slds-grid slds-wrap slds-p-vertical_medium">
<div class="slds-size_3-of-12 slds-p-left_xx-large slds-p-horizontal_x-large">
This is English
</div>
</div>
<aura:set attribute="else">
<div aura:id="Spanish" class="demo-only demo-only--sizing slds-grid slds-wrap slds-p-vertical_medium">
<div class="slds-size_3-of-12 slds-p-left_xx-large slds-p-horizontal_x-large" >
This is Spanish
</div>
</div>
</aura:set>
</aura:if>
</aura:set>
</aura:if>

<!--End of mutiple if's -->

</aura:component>


Controller.js

({
toggle: function (component, event, helper) {

var sel = component.find("mySelect");
var nav = sel.get("v.value");

if (nav == "German") {
component.set("v.toggleGer", true);

}else if(nav == "Spanish"){
component.set("v.toggleGer", false);
component.set("v.toggleEng", false);


}else if(nav == "English"){
component.set("v.toggleGer", false);
component.set("v.toggleEng", true);

}

},
})


Depending up on the requirement , you can refer input fields or sections that you need. it will re-render based on the pick-list that we selected.

Hope this helps!


Use Google Map’s Api in Lightning Components , Salesforce

Requirement:

Create a picklist with 3 to 4 languages. Based on language selection, auto-suggestions should display on input text form. Once the Place is selected, need to make another call out to get the details of that place.

Google Auto Suggestion

Solution:

First , we need to register our email to get the google maps key.
Google is offering multiple auto search api’s. We have to choose “Server-side and client-side” Api.

Follow below link to register in Google.
https://developers.google.com/places/web-service/autocomplete

https://developers.google.com/places/web-service/details

1) Click on “Get” Key
2) Enabel Api
3) Copy the key

Go to Developer console and click on new component — GoogleAutoSearch.cmp

view raw

Google Search

hosted with ❤ by GitHub

Component JS Controller :


({
loadOptions: function (component, event, helper) {
var opts = [
{ value: "de", label: "German" },
{ value: "es", label: "Spanish" },
{ value: "ta", label: "Tamil" },
{ value: "en", label: "English" }
];
component.set("v.options", opts);
},
handleSelect:function(component,event,helper){
var selected = event.getSource().get("v.value");
},
keyPressController: function (component, event, helper) {
var prpAct2=component.find("prptext3");
var prpActVal2 = prpAct2.get("v.value");
prpAct2.set("v.errors", null);
var searchKey = component.get("v.searchKey");
var Language = component.get("v.selectedValue");
helper.openListbox(component, searchKey);
helper.displayOptionsLocation(component, searchKey,Language);
},
clear: function (component, event, helper) {
helper.clearComponentConfig(component);
},
})

Component -JS – helper


({
displayOptionsLocation: function (component, searchKey , Language) {
var action = component.get("c.getAddressAutoComplete");
action.setParams({
"input": searchKey,
"langug": Language,
"types": '(regions)'
});
action.setCallback(this, function (response) {
var state = response.getState();
if (state === "SUCCESS") {
var options = JSON.parse(response.getReturnValue());
var predictions = options.predictions;
var addresses = [];
if (predictions.length > 0) {
for (var i = 0; i < predictions.length; i++) {
var bc =[];
for(var j=0;j<predictions[i].terms.length;j++){
bc.push(predictions[i].terms[j].offset , predictions[i].terms[j].value );
}
addresses.push(
{
value: predictions[i].types[0],
PlaceId: predictions[i].place_id,
locaval: bc,
label: predictions[i].description
});
}
component.set("v.filteredOptions", addresses);
}
}
});
$A.enqueueAction(action);
},
sendSelectedOption:function(component,locaval2){
var action1 = component.get("c.processWebResp");
action1.setParams({
"Res": locaval2
});
action1.setCallback(this, function (response) {
var state = response.getState();
if (state === "SUCCESS") {
console.log('This is webservice resp >>');
}
});
$A.enqueueAction(action1);
},
displayOptionDetails: function(component,event,placeid,PropId){
var self = this;
var action1 = component.get("c.getAddressDetails");
action1.setParams({
"PlaceId": placeid
});
action1.setCallback(this, function (response) {
var state = response.getState();
if (state === "SUCCESS") {
var options = JSON.parse(response.getReturnValue());
var Addressdet = options.result;
var key = "address_components";
var o = Addressdet[key] // value2
for(var prop in o) {
console.log(prop,o[prop]);
}
var key1="geometry";
var o1=Addressdet[key1];
var key2="location";
var o2=o1[key2];
self.insertRecords(component,event,o,o2,PropId);
}
});
$A.enqueueAction(action1);
},
insertRecords:function(component,event,data,data1,PropId){
for(var prop in data) {
console.log(prop,data[prop]);
}
var d=data;
var d1=data1;
var action1 = component.get("c.processWebResp");
action1.setParams({
"Res":JSON.stringify(d),
"Res1":JSON.stringify(d1),
"Res2": PropId
});
action1.setCallback(this, function (response) {
var state = response.getState();
if (state === "SUCCESS") {
}
});
$A.enqueueAction(action1);
},
openListbox: function (component, searchKey) {
var searchLookup = component.find("searchLookup");
if (typeof searchKey === 'undefined' || searchKey.length < 3)
{
$A.util.addClass(searchLookup, 'slds-combobox-lookup');
$A.util.removeClass(searchLookup, 'slds-is-open');
return;
}
$A.util.addClass(searchLookup, 'slds-is-open');
$A.util.removeClass(searchLookup, 'slds-combobox-lookup');
},
clearComponentConfig: function (component) {
var searchLookup = component.find("searchLookup");
$A.util.addClass(searchLookup, 'slds-combobox-lookup');
component.set("v.selectedOption", null);
component.set("v.searchKey", null);
var iconDirection = component.find("iconDirection");
$A.util.removeClass(iconDirection, 'slds-input-has-icon_right');
$A.util.addClass(iconDirection, 'slds-input-has-icon_left');
},
})

Apex Controller:


/** Class Name : POC_RegionTreeController
* Description : This class is used make google api callouts and get the response
* Created By : Veera k
* Created On : 31/10/2017
*
* Modification Log:
* ————————————————————————————————————————————–
* Developer Date Modification ID Description
* ————————————————————————————————————————————–
*
**/
global class POC_RegionTreeController{
/**
* @description : Auto suggestion Web Service
* @param : input: SearchAddress , types: Results Types , langug : language for getting the results
* @return : string
**/
@AuraEnabled
global static string getAddressAutoComplete(String input, String types,String langug) {
String url = 'https://maps.googleapis.com/maps/api/place/autocomplete/json?input=&#39;
+ EncodingUtil.urlEncode(input, 'UTF-8')
+ '&language=' + langug
+ '&key=' + POC_RegionTreeController.getGoogleMapsAPIKey();
return POC_RegionTreeController.getHttp(url);
}
/**
* @description : Place Details Web Service
* @param : PlaceId: Unique Place Id , langug : language for getting the results
* @return : string
**/
@AuraEnabled
global static string getAddressDetails(String PlaceId,String lang) {
String url = 'https://maps.googleapis.com/maps/api/place/details/json?placeid=&#39;
+PlaceId+'&language='+lang+'&key='+ POC_RegionTreeController.getGoogleMapsAPIKey();
return POC_RegionTreeController.getHttp(url);
}
/**
* @description : To get the google Api key from custom label
* @param :
* @return : string
**/
global static String getGoogleMapsAPIKey(){
String GMapkey= Label.TXP_Google_Key;
return GMapkey;
}
/**
* @description : Common Utility method for making call out
* @param : String
* @return : string
**/
global static string getHttp(String url){
try{
Http http = new Http();
HttpRequest request = new HttpRequest();
request.setEndpoint(url);
request.setMethod('GET');
HttpResponse response = http.send(request);
return response.getBody();
}catch(Exception e){
return 'sample string';
}
}
/**
* @description : Parsing Json Response for Auto Suggestion (1st Web Service)
* @param : String
* @return : List<AddressJsonInfo>
**/
public static List<AddressJsonInfo> parse(String json) {
return (List<AddressJsonInfo>) System.JSON.deserialize(json, List<AddressJsonInfo>.class);
}
/**
* @description : Parsing Json Response for Place Details (3rd and 4th Web Service)
* @param : String
* @return : TXP_JSON2Apex
**/
public static TXP_JSON2Apex parse2(String json) {
return (TXP_JSON2Apex) System.JSON.deserialize(json, TXP_JSON2Apex.class);
}
/**
* @description : Parsing Json Response for Place Details (2nd Web Service)
* @param : String
* @return : GeoLoca
**/
global static GeoLoca parse1(String json) {
return (GeoLoca) System.JSON.deserialize(json, GeoLoca.class);
}
/**
* @description : Wrapper class for getting latitude and longtitude (Second Web Service)
* @param :
* @return :
**/
global class GeoLoca{
global Double lat; //6.9121796
global Double lng; //79.8828828
}
/**
* @description : Wrapper class for getting Address (First Web Service)
* @param :
* @return :
**/
global class AddressJsonInfo {
global String long_name;
global String short_name;
global List<String> types;
}
/**
* @description : Wrapper class for getting latitude and longtitude (Second Web Service)
* @param :
* @return :
**/
public class Geometry {
public Location location;
public Viewport viewport;
}
public class Viewport {
public Location northeast;
public Location southwest;
}
public class Location {
public Double lat;
public Double lng;
}
/**
* @description : Wrapper class for Place Details (Third and fourth Web Service)
* @param :
* @return :
**/
public class TXP_JSON2Apex {
public List<Html_attributions> html_attributions;
public Result result;
public String status;
}
public class Html_attributions {
}
public class Result {
public List<Address_components> address_components;
public String adr_address;
public String formatted_address;
public Geometry geometry;
public String icon;
public String id;
public String name;
public String place_id;
public String reference;
public String scope;
public List<String> types;
public String url;
public Integer utc_offset;
public String vicinity;
}
public class Address_components {
public String long_name;
public String short_name;
public List<String> types;
}
}

Different clouds in salesforce

Sales Cloud platform

Salesforce Sales Cloud is a CRM  platform designed to manage the sales, marketing and customer support facets of business-to-business (B2B) and business-to-customer (B2C) engagement strategies.

To aid with new and existing lead management and lead monitoring, users can create custom lead-capture forms, view and access a lead’s most up-to-date contact information in an activity timeline and establish automatic lead routing to ensure that customer engagement and sales personnel receive timely notification of hot leads. Users can also track and analyze marketing campaign data and its impact on lead generation. This data can be viewed and used by sales teams and translated into more effective sales performance.

Features of Sales cloud:

  • Einstein High Velocity Sales Cloud
  • Outlook integration
  • Opportunity Kanban (Forecasting)
  • Lead management
  • Lead assignment and routing
  • Rules-based lead scoring
  • Einstein lead scoring
  • Duplicate blocking
  • Web-to-lead capture
  • Mass email
  • Campaign Management
  • Campaign Influence
  • Email templates
  • Salesforce Engage
  • Pardot B2B Marketing Automation
  • Manage customer and sales details.
  • Account and contact management
  • Einstein Account Insights
  • Opportunity Management
  • Sales Path
  • Einstein Opportunity Insights
  • Sales Teams
  • Task Management, Activity feed
  • Einstein Activity Capture
  • Calendar All
  • Sales Console app
  • Lightning Voice
  • Person Accounts
  • Sell from anywhere on any device.
  • Salesforce1 Mobile App
  • Full Offline Mobile Functionality
  • Inbox Mobile App
  • Forecast sales more accurately.
  • Collaborative forecasting
  • Custom Opportunity fields in forecasting
  • Collaborative forecasting with opportunity splits
  • Forecasting mobile app
  • Enterprise territory management
  • Configure, price, quote, and bill.
  • Contracts
  • Orders
  • Products and price books
  • Quotes
  • Salesforce Quote-to-Cash
  • Salesforce Billing
  • Get real-time sales insights.
  • Configurable Reports and Dashboards
  • Advanced reporting features
  • Wave App for Sales
  • Collaborate across your company.
  • Chatter
  • Files
  • Topics and Recommendations
  • Extend Salesforce to your partners.
  • Lead registration
  • Partner Communities
  • Lightning Bolt solutions
  • Cross-sell and upsell more easily.
  • Customise and automate processes.
  • com
  • Process Builder (processes per org)
  • Workflow and approval automation
  • Lightning App Builder
  • AppExchange
  • Unlimited custom applications
  • Connect sales info to any app.
  • Web Services API
  • Lightning for Gmail (beta) or Outlook
  • Inbox Desktop Apps
  • Send email through Gmail or Outlook
  • Google Apps integration
  • Lightning Sync

Different Editions of salescloud :

SalesforceIQ CRM Starter Edition — Let up to five users track and manage all your sales leads, opportunities, and customer cases. You’ll also get more insights into your business with basic reports and dashboards.


Professional Edition — Let an unlimited number of users manage your entire sales cycle. In addition to basic sales and marketing features, you can manage marketing campaigns, contracts, orders, and more. Get even more business insights with accurate sales forecasts and customizable dashboards.


Enterprise Edition — Automate business processes using workflow and approvals, tailor Sales Cloud to your company with custom record types, and integrate with any system using our web services API. You can also manage complex sales territories, and see how your sales deals have progressed with deal trending.


Unlimited Edition — Get access to unlimited online training, over 100 admin services, and 24/7 toll-free support. Tailor Salesforce to fit your business by building custom objects and creating an unlimited number of custom tabs and apps. Plus, your admins will have access to several sandboxes for development and testing.


Service Cloud Platform

Licenses for Service Cloud

Service Cloud User: Lets support agents use the console for service.

Knowledge User:  Lets support agents create and edit knowledge base articles.

Live Agent User: Lets support agents communicate with customers using Web chat.

Customer Community: Lets support agents communicate with customers on an online community.

Features of Service cloud:

Feature Description
Case Management Record, track and solve customer issues across sales, service and support. Includes ability to create cases from an email (email to case) and from a web form (web to case). Cases can be managed in queues. Assignment rules and escalation rules can be defined.
Activities Activities in Salesforce are Tasks and Events. Activities can have a priority and assignment to a user that are related to cases or other Salesforce standard or custom objects.
CTI Integration Integration of telephony systems with Salesforce to allow functionality such as screen popping (display of incoming caller information), automatic dialling and phone control.
Contracts and Entitlements Recording of service contracts (e.g. warranties, subscriptions, maintentance agreements) related to accounts and the level of entitlement applicable that can be verified to determine if customers are eligible for support.
Call Scripting Provide a online interactive script for sales or support staff to follow when talking to a customer.
Live Agent Chat Provides a chat interface to allows customers to chat with Salesforce customer sales or service agents.
Solution Management Allows you to capture in a central location information to answer customer questions and support requests. Adds a search facility to access solutions via cases. Auto suggestions can be enabled to suggestion solutions based on case content. Solutions can also be exposed via a customer portal or a public website.
Service Cloud Console Consolidated view of related records in one screen with different frames to improve agent productivity. For example, instead of having to scroll down to the related lists of a contact and navigate to related records, the service cloud console allows you to navigate to related records via tabs.
Ideas Provides a facility for internal staff, customers and partners to submit, discuss and vote on ideas.
Social Service Monitor and create cases from tweets and posts. Resolve cases in social channels.
Communities for Service Customer self-service for issue management, searching for solutions and enabling customers to have discussion and answer questions between themselves.
Asset Management Allows tracking of which customers own what products. Can track the purchase date, install date, serial number, quantity and even if it is a competitor asset.
Knowledge Management Knowledge base of FAQs, common customer service response, resolutions and other information that is useful for solving issues, cases both accessible internally and externally in multiple channels.
Partner Service Collaboration Salesforce to Salesforce connection to allow creation and update of cases between partners.


Community Cloud

At its most basic level, a community is a group of people who share a common mission or goal. You can define what collaboration model best fits your needs. Do you want to have customers helping one another out? Peer-to-peer communities do just that. Perhaps you want a portal, where your customers can, for example, access account information.


Customer Community:  Best for service and marketing use cases (Powerful capabilities for customer service and engagement)

Partner Community:  Best for partner and channel management (Empower partners with deal collaboration and productivity tools)

Employee Community:  For mobile and social intranets (Transform your workplace and harness the power of social and mobile)

Differences between three communities:

CUSTOMER

COMMUNITY

PARTNER

COMMUNITY

Employee 

COMMUNITY

Includes the following features: Includes the following features: Includes the following features:
Social collaboration for customers and employees Role-based sharing for controlled data access Accounts (read-only)
Mobile access Lead and opportunity management Contacts (read-only)
Custom branding Delegated administration capabilities Chatter Collaboration
Q & A for self-service Run and Export Reports Salesforce Knowledge (read-only)
Access to support cases, accounts, and contacts Dashboard viewing Cases (create, read, comment only)
Knowledge base articles Social collaboration for customers and employees 10 custom objects
Idea submission and endorsement Mobile access Dashboards
10 custom objects Custom branding Reports
Salesforce Identity Q & A for self-service Answers and Ideas
Powerful capabilities for customer service and engagement Access to support cases, accounts, and contacts Workflow
  Knowledge base articles Tasks and Events
  Idea submission and endorsement Advanced sharing
  10 custom objects  
  Salesforce Identity


Data Cloud

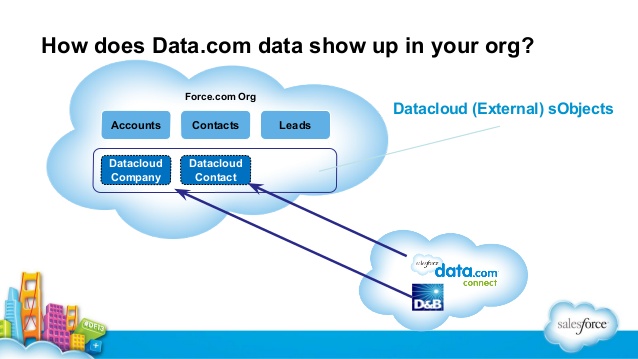
Data.com Clean helps you automatically update and enrich the account, contact and lead data that drives your most important sales and marketing processes, all right inside Salesforce.


data cloud 1

data cloud 2

Data.com: It will sync all the contacts and lead information from salesforce.

How to use Connect API in Apex

Using Connect Api , we can access the chatter post and delete the posts using apex.

Scenario: How to post an announcement to a community

Using “ConnectApi.Announcements” class , we can create/update/read/delete the announcements.

208

Post an Announcement:

Syntax:

public static ConnectApi.Announcement postAnnouncement(String communityId, ConnectApi.AnnouncementInput announcement)

Parameters:
CommunityID — String
announcement — ConnectApi.AnnouncementInput object
Return type:
ConnectApi.AnnouncementInput


/**
*
* Posting an announcement to community using ConnectApi namespace.
*
* Includes convenience methods to:
*
* – Post Chatter @-mentions, rich text, and inline images with Apex code.
* – Take a feed item or comment body and return an input body that matches it.
* This is useful for when you want post an announcement and send emails to the users.
*
* This class works with API version 32.0 and later.
*
*
*/


public class postingAnnoucement{

/**
* Creating an Announcement using ConnectApi.Announcement
*
* @param – None
* @return – Announcement
*/

public ConnectApi.AnnouncementInput myAnnouncement(){
//Creating an announcement
ConnectApi.AnnouncementInput newAnnouncement = new       ConnectApi.AnnouncementInput();
newAnnouncement.expirationDate= datetime.now(); // Announcement Expiration Time, usually it will be expire on end of the day.
newAnnouncement.sendEmails=true;
newAnnouncement.ParentID=’232323sdsd’;
return newAnnouncement;

}

/**
* Posting an Announcement on community using ConnectApi.Announcement
*
* @param – None
* @return – Void
*/

public void postAnnouncement(){

ConnectApi.AnnouncementInput input=myAnnouncement();
ConnectApi.Announcement myfinalannouncemnt=                ConnectApi.Announcements.postAnnouncement(‘communityid’, input);

}

}


Next time will see you with some other interesting topic, Thank you.